I’ve had some trouble researching “git versioning strategies” in the past. Part of the trouble is searching Google, whose current search algorithms so ruthlessly optimize for “most people search THIS, so that’s what you must’ve meant” and “here is the one-sentence result that our Google Assistant can read to you from your smart microwave” that finding blog posts on abstract versioning-releasing strategies is nearly impossible. But part of the trouble I think is that people don’t generally write too many articles about something as “internal” as software versioning best practices. Instead, those articles are generally found in README files in their private github repos.
So here’s my accounting of my team’s “Next-Minor” versioning strategy, which dictates the structure of our git repositories’ branches, tags and releases. This post might serve no purpose other than to remind me how we did all this stuff the next time I need to set up a new large project.
This strategy is a very common one, in use across all kinds of software products. I don’t know if it has an official inventor or even a commonly-accepted name; if it does, I can’t find it. So I’m going with Next-Minor Versioning Strategy (NMVS). Because, as the strategy goes, your code on main will always be the next minor release.
Terminology
For simplicity’s sake, I’ll refer to the main trunk of your codebase as main (historically sometimes called trunk or master). All versioning schemas will be in the semver style, of major.minor.patch, for example, 4.2.13. Any examples or specific version control terminology will come from git and/or GitHub. But this strategy should work with any other VCS, or could be adapted to work with other versioning schemas.
Summary
In short: main always contains all the newest code, and when main is released, it will be the next minor version. For example, if the “current release” is 2.3.13, the next minor version will be 2.4.0.
This means the current minor, in the above example 2.3.X, is maintained on its own branch—in this case a branch simply called 2.3. That branch is where the current release was cut from, and if there is a next patch release (say, 2.3.14), it would be cut from the 2.3 git branch as well.
In typical development cycles, NMVS dictates that you should always work against main, which means branching from main and merging back into main, and you should port only “bug fixes” to the current minor branch (2.3).
I’m going to attempt to make a visual representation of this branching strategy. Historically, I’ve always hated these version control branching diagrams, and never really understood them, but maybe if I make one myself I’ll like it. Let’s try it out.
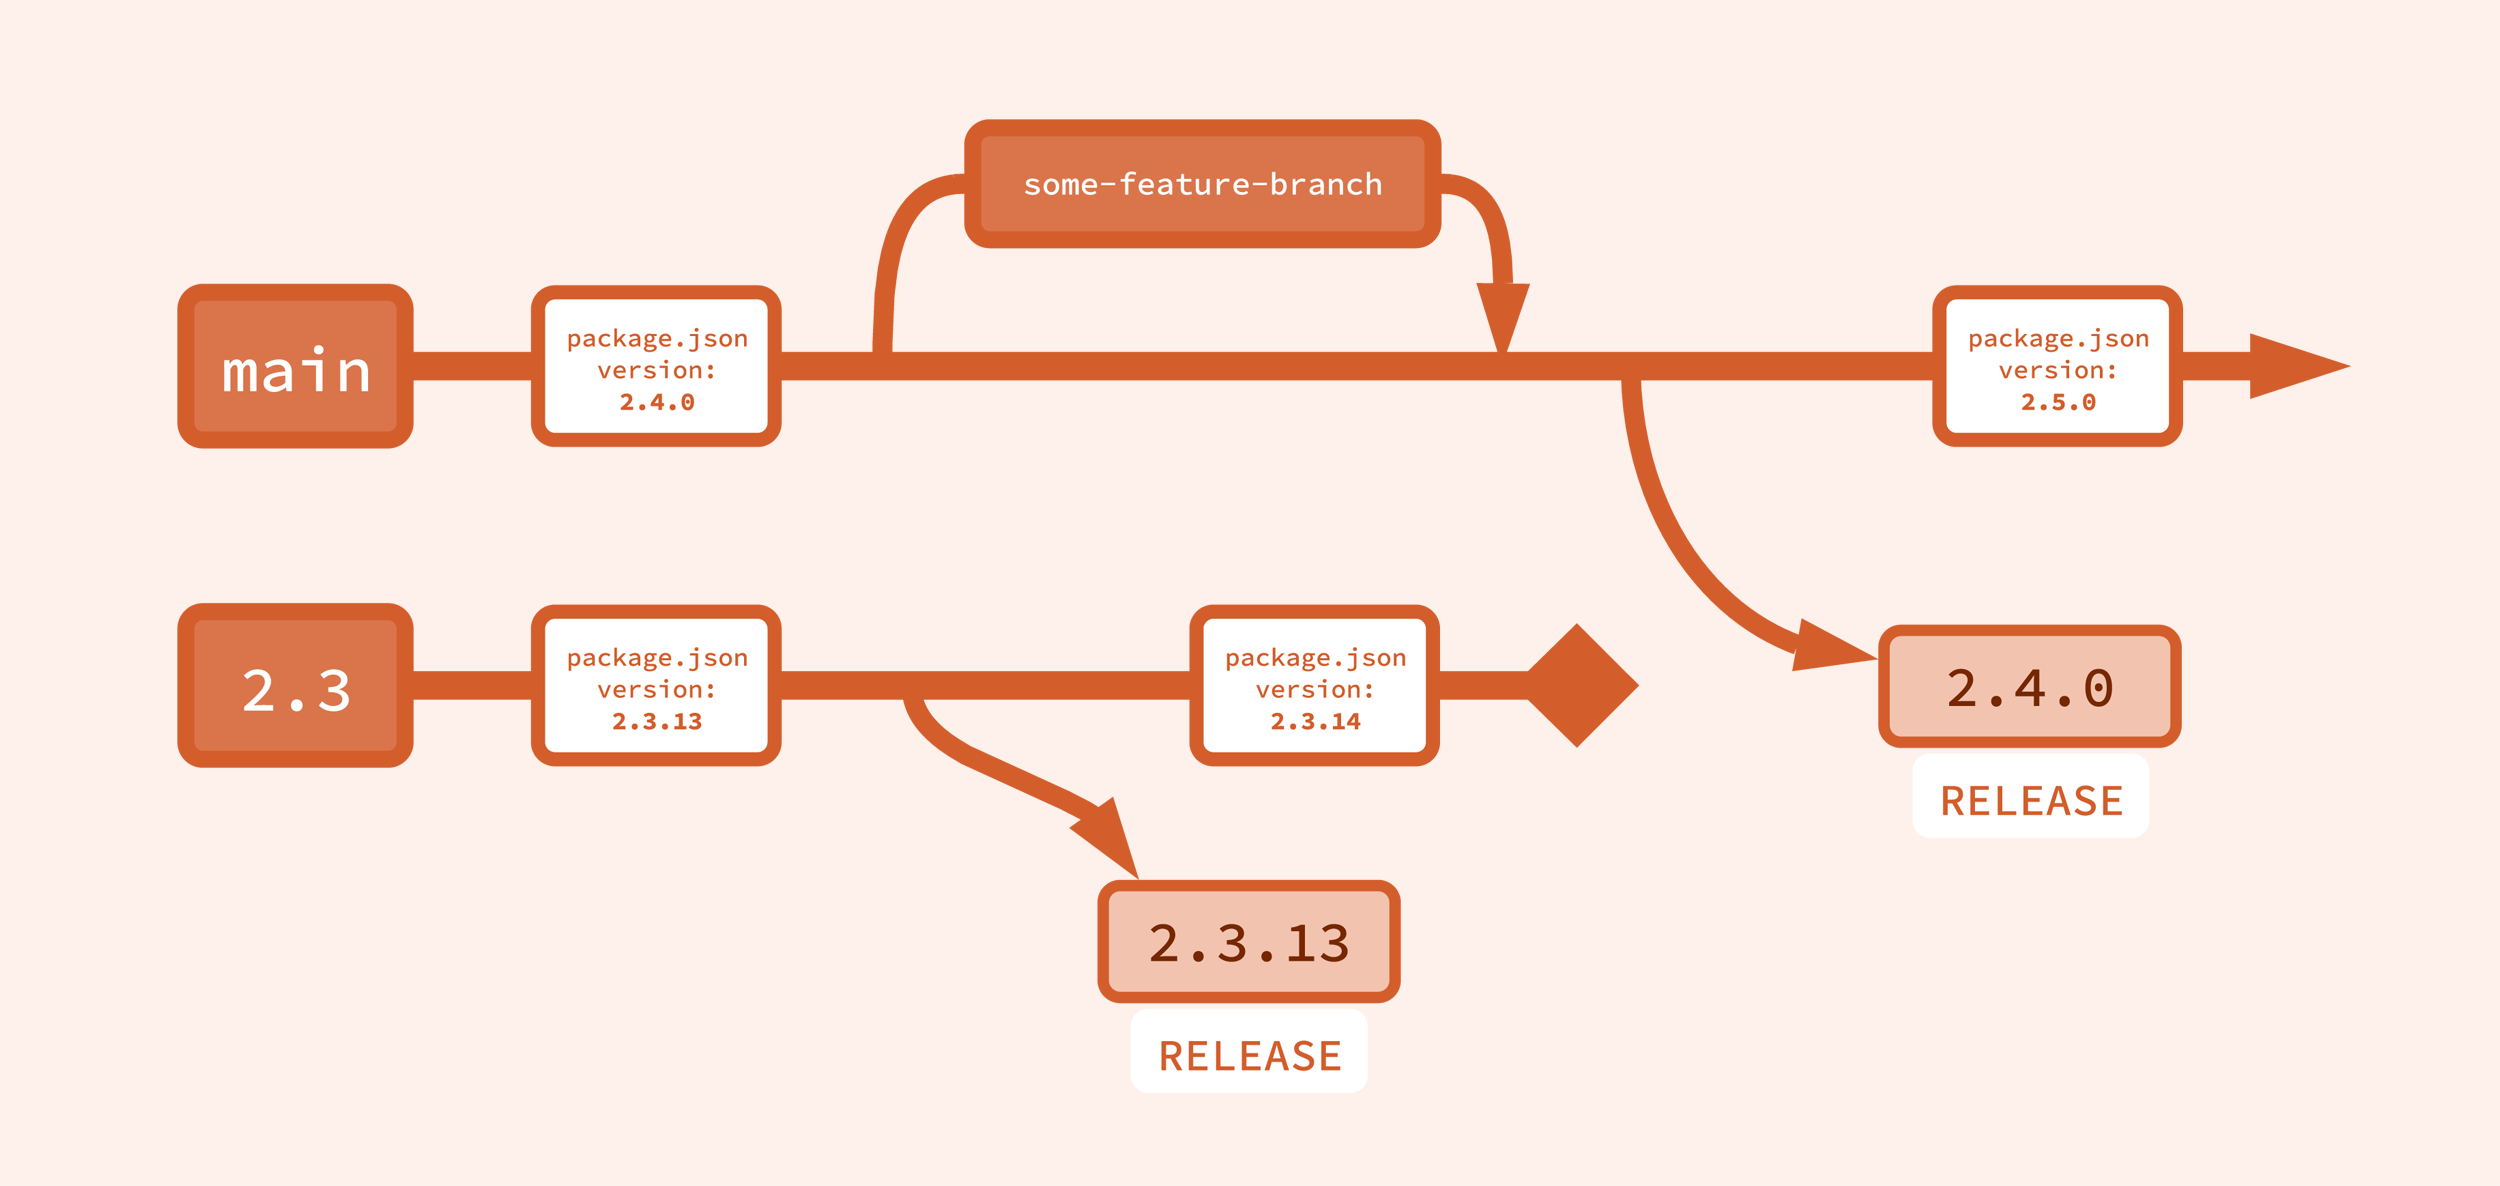
Okay, this maybe works. It’s simplified, but covers the major point: the main branch, across the top, is where work happens. And releases from main are the next minor version. After a release, the version of the code on main is incremented (in this example, it’s the version in a package.json file, which gets incremented to the next minor, 2.5.0).
The minor branch across the bottom, 2.3, is where patch releases happen. After each patch release, the version of the code on the minor branch is also incremented. When the next minor is released from main, the old minor branch is effectively dead.
But where did that 2.3 branch come from? And what will replace it? Where does 2.4 come from? Well, I didn’t want to put all of that in the first diagram because things got too complicated. So the first diagram was a bit of a lie, and for that I apologize. But let’s look at what actually happens during a release.
Releasing code
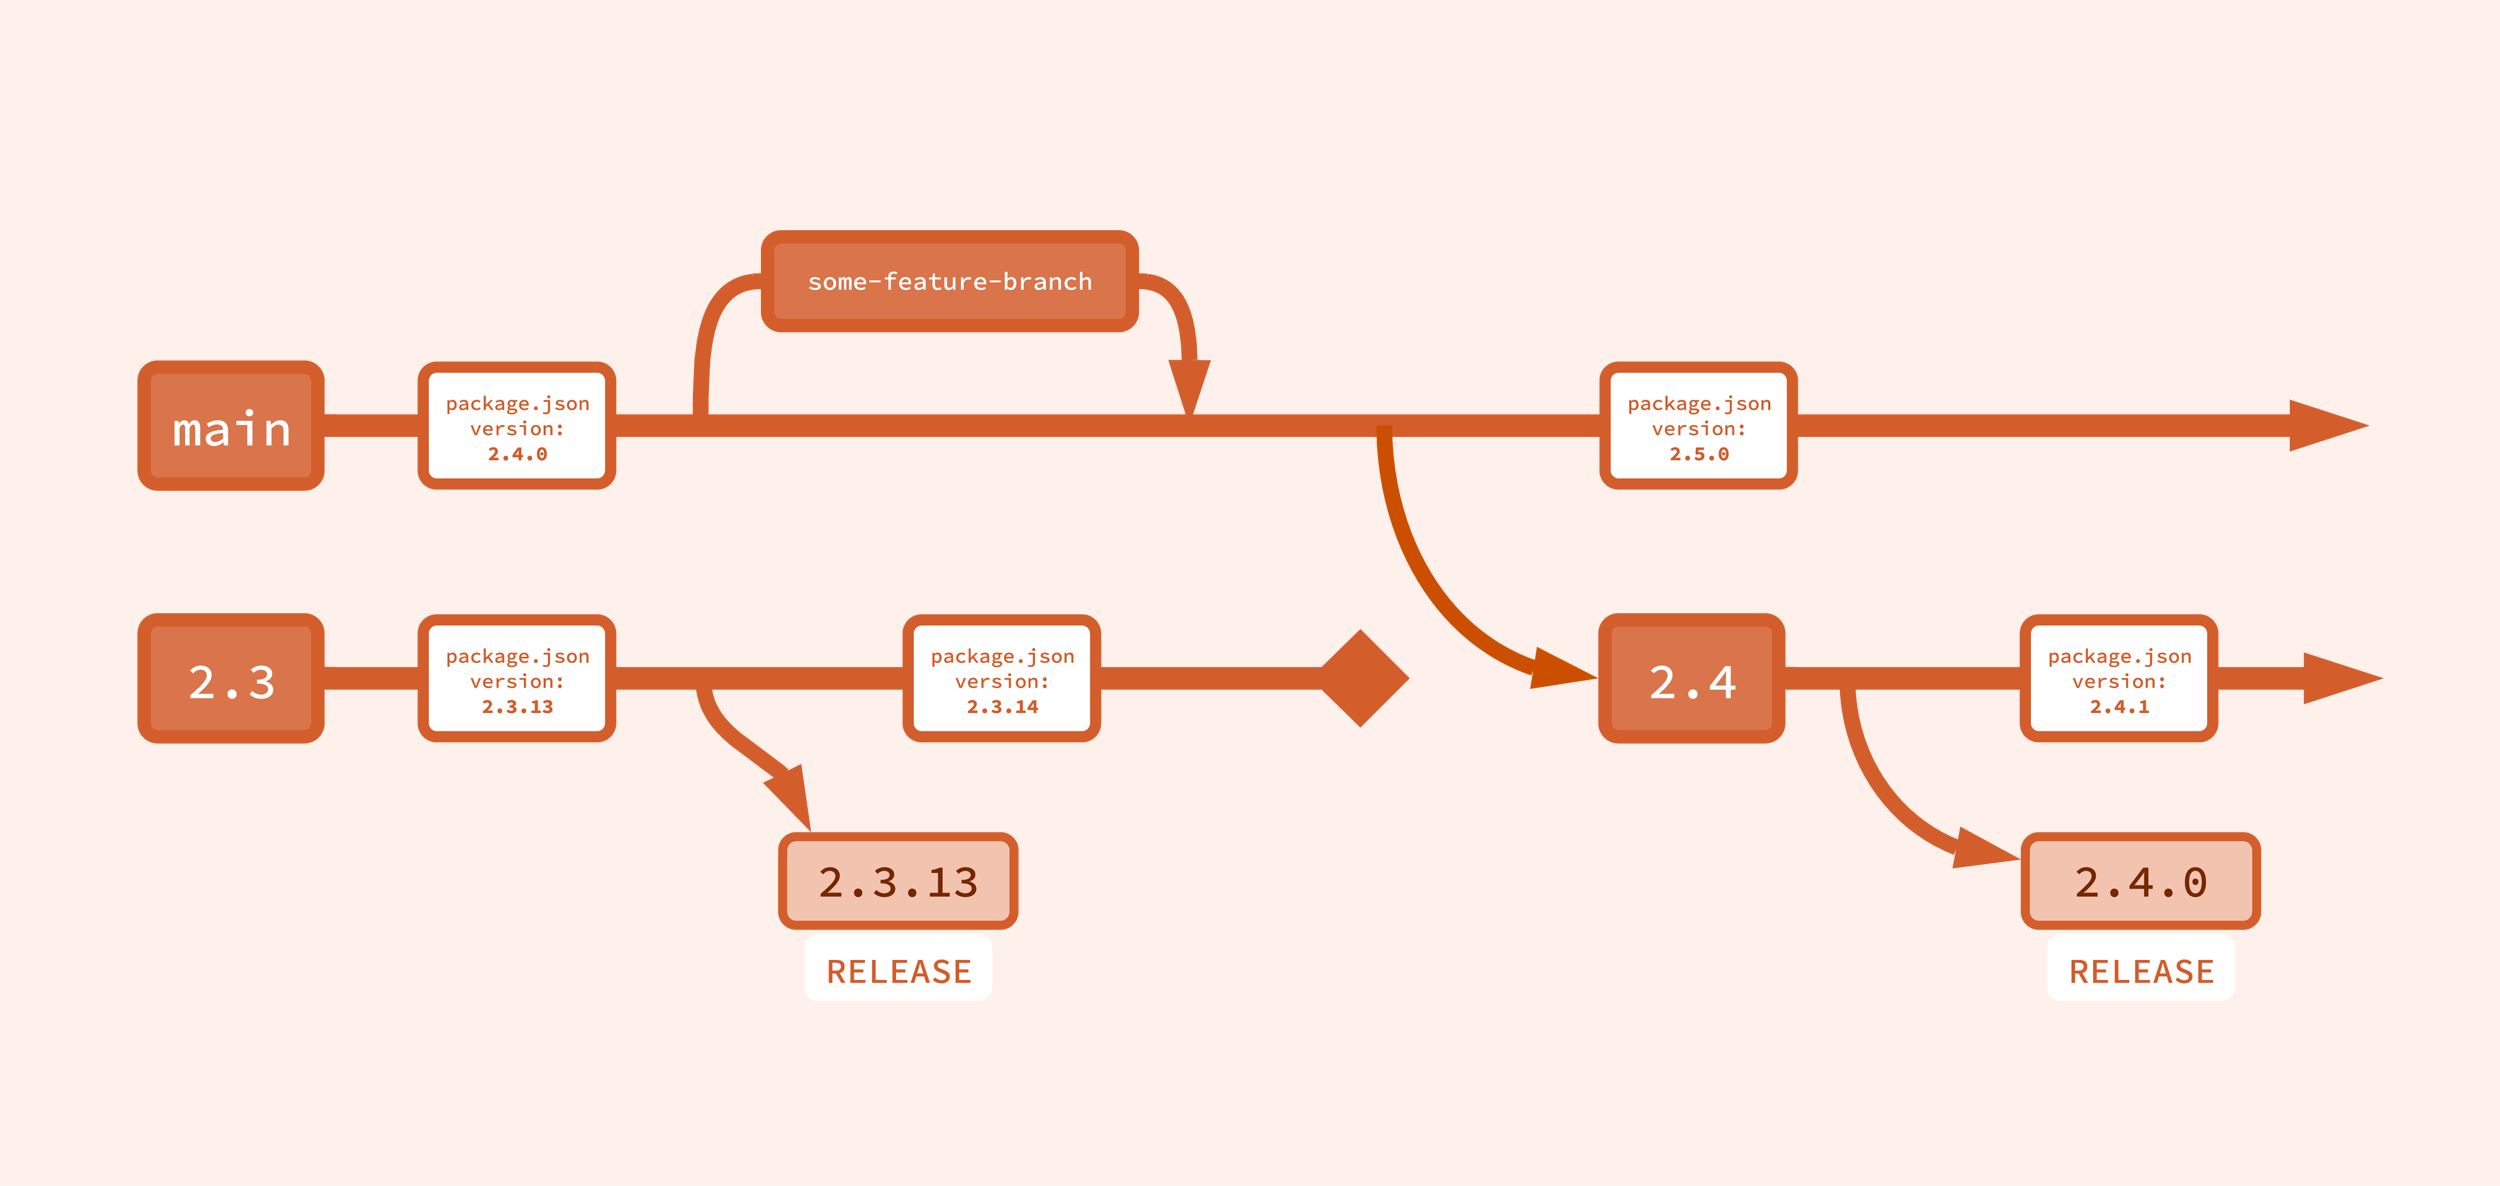
Let’s see what the above diagram looks like when we add what actually happens for a new minor release from main:
New minor branches are branched from main when the time comes for a new minor release, in the above example it was the 2.4 branch that was created.
All releases technically happen only from minor branches. (Even the release of a new major version, say 3.0, is technically the patch release of 3.0.0.)
How-To: Patch release
So let’s say we want to do a patch release of version 2.3.13 in this example. The steps are:
(1) Checkout the minor branch from which to cut the release. (Make sure it’s up to date by fetching/pulling if necessary.)
git checkout 2.3
(2) Use git tag to tag the release.
git tag 2.3.13
git push origin 2.3.13
(3) Head back to the minor branch and increment its version in the code.
git checkout 2.3
[edit package.json files, etc, to update version to 2.3.14]
That’s it. The version management part is done. Now all you need to do is actually build/release the code you tagged with 2.3.13.
Typically you would check out that tag:
git checkout 2.3.13
Then follow release steps specific to your code base. In many cases this will involve building images or making executables… That sort of thing.
At this point I also like using GitHub’s Releases interface to create an official release for 2.3.13, so it can be a documented artifact. See GitHub’s docs for how to create a release in your repository.
How-To: New minor release
If you want to release a new minor, which comes from the code on main, there’s really only one unique step: You need to create a branch off of main! First, ensure you are on main and have pulled in the latest code. Then, create the new minor branch. In this example, the existing minor branch was 2.3, so we will create 2.4 from main:
git checkout -b 2.4
git push origin 2.4
The version of the code in main should already be 2.4.0, which means that the code in main needs to be incremented to 2.5.0 now:
git checkout main
[edit package.json files, etc, to update version to 2.5.0]
And you’re done. Now, you’ll follow the steps above for a patch release from the new minor branch you just created (2.4). Your release will be 2.4.0.
If this is making sense to you so far, but you feel like perhaps something’s missing, you’re right. We haven’t covered how to actually get changes INTO a minor branch. Up to this point, all of the coding and merging has happened only on main.
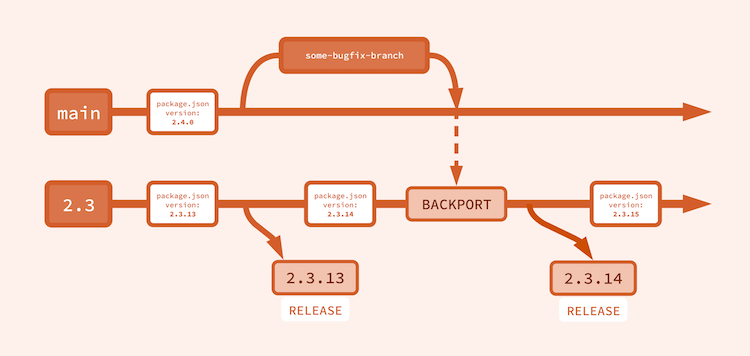
Once again I have lied to you. The above diagram was still too simplified; backporting is the key feature that allows for patch releases, but I didn’t put it in the previous diagrams because, once again, they got too complicated. Please accept my apologies as we cover backporting.
Backporting
All code is merged into main, but only some code is backported to the current minor branch. Exactly what code does and does not get backported is up to you, but I like the rule that only bug fixes get backported.
As a result, all patch releases off the current minor branch will contain only relatively small bug fixes. And the next minor, from main, will contain all the new features.
Backporting is the process of selectively copying specific commits from one branch to another. In the context of NMVS, backporting involves cherry-picking commits from main to the “current minor” branch.
You can perform a backport manually after merging code into main using git. The primary command for copying individual commits is git cherry-pick. The command takes the commit hash or reference as an argument and applies the changes made in that commit to the current branch.
For example, to backport a single commit with the hash abcdefg from main to the current minor branch 2.3, you would run the following commands:
git checkout 2.3
git cherry-pick abcdefg
It’s possible at this point you’ll encounter a code conflict, and git will prompt you to resolve it. But in my experience this is surprisingly rare, as only bug fixes were ever backported to the current minor branch after already applying them to main, so things generally keep in sync.
But, if you do manual backporting, you’ll probably need to brush up on some full documentation for the cherry-pick command.
To simplify the backport process, you may want to consider a backporting helper library. I recommend backport if you’re working with a node project. It also has extensive documentation on how to automate backporting with GitHub actions, that way PRs labeled as “bugfix”, for example, can be automatically backported when the PR to main is merged. It’s a huge timesaver, highly recommend.
Releasing a Major Version
Eventually the time might come when you want to release a major version; if we keep our examples above going, this would be version 3.0.0. What then? All you have to do is increment the version on main to the next major, instead of the next minor.
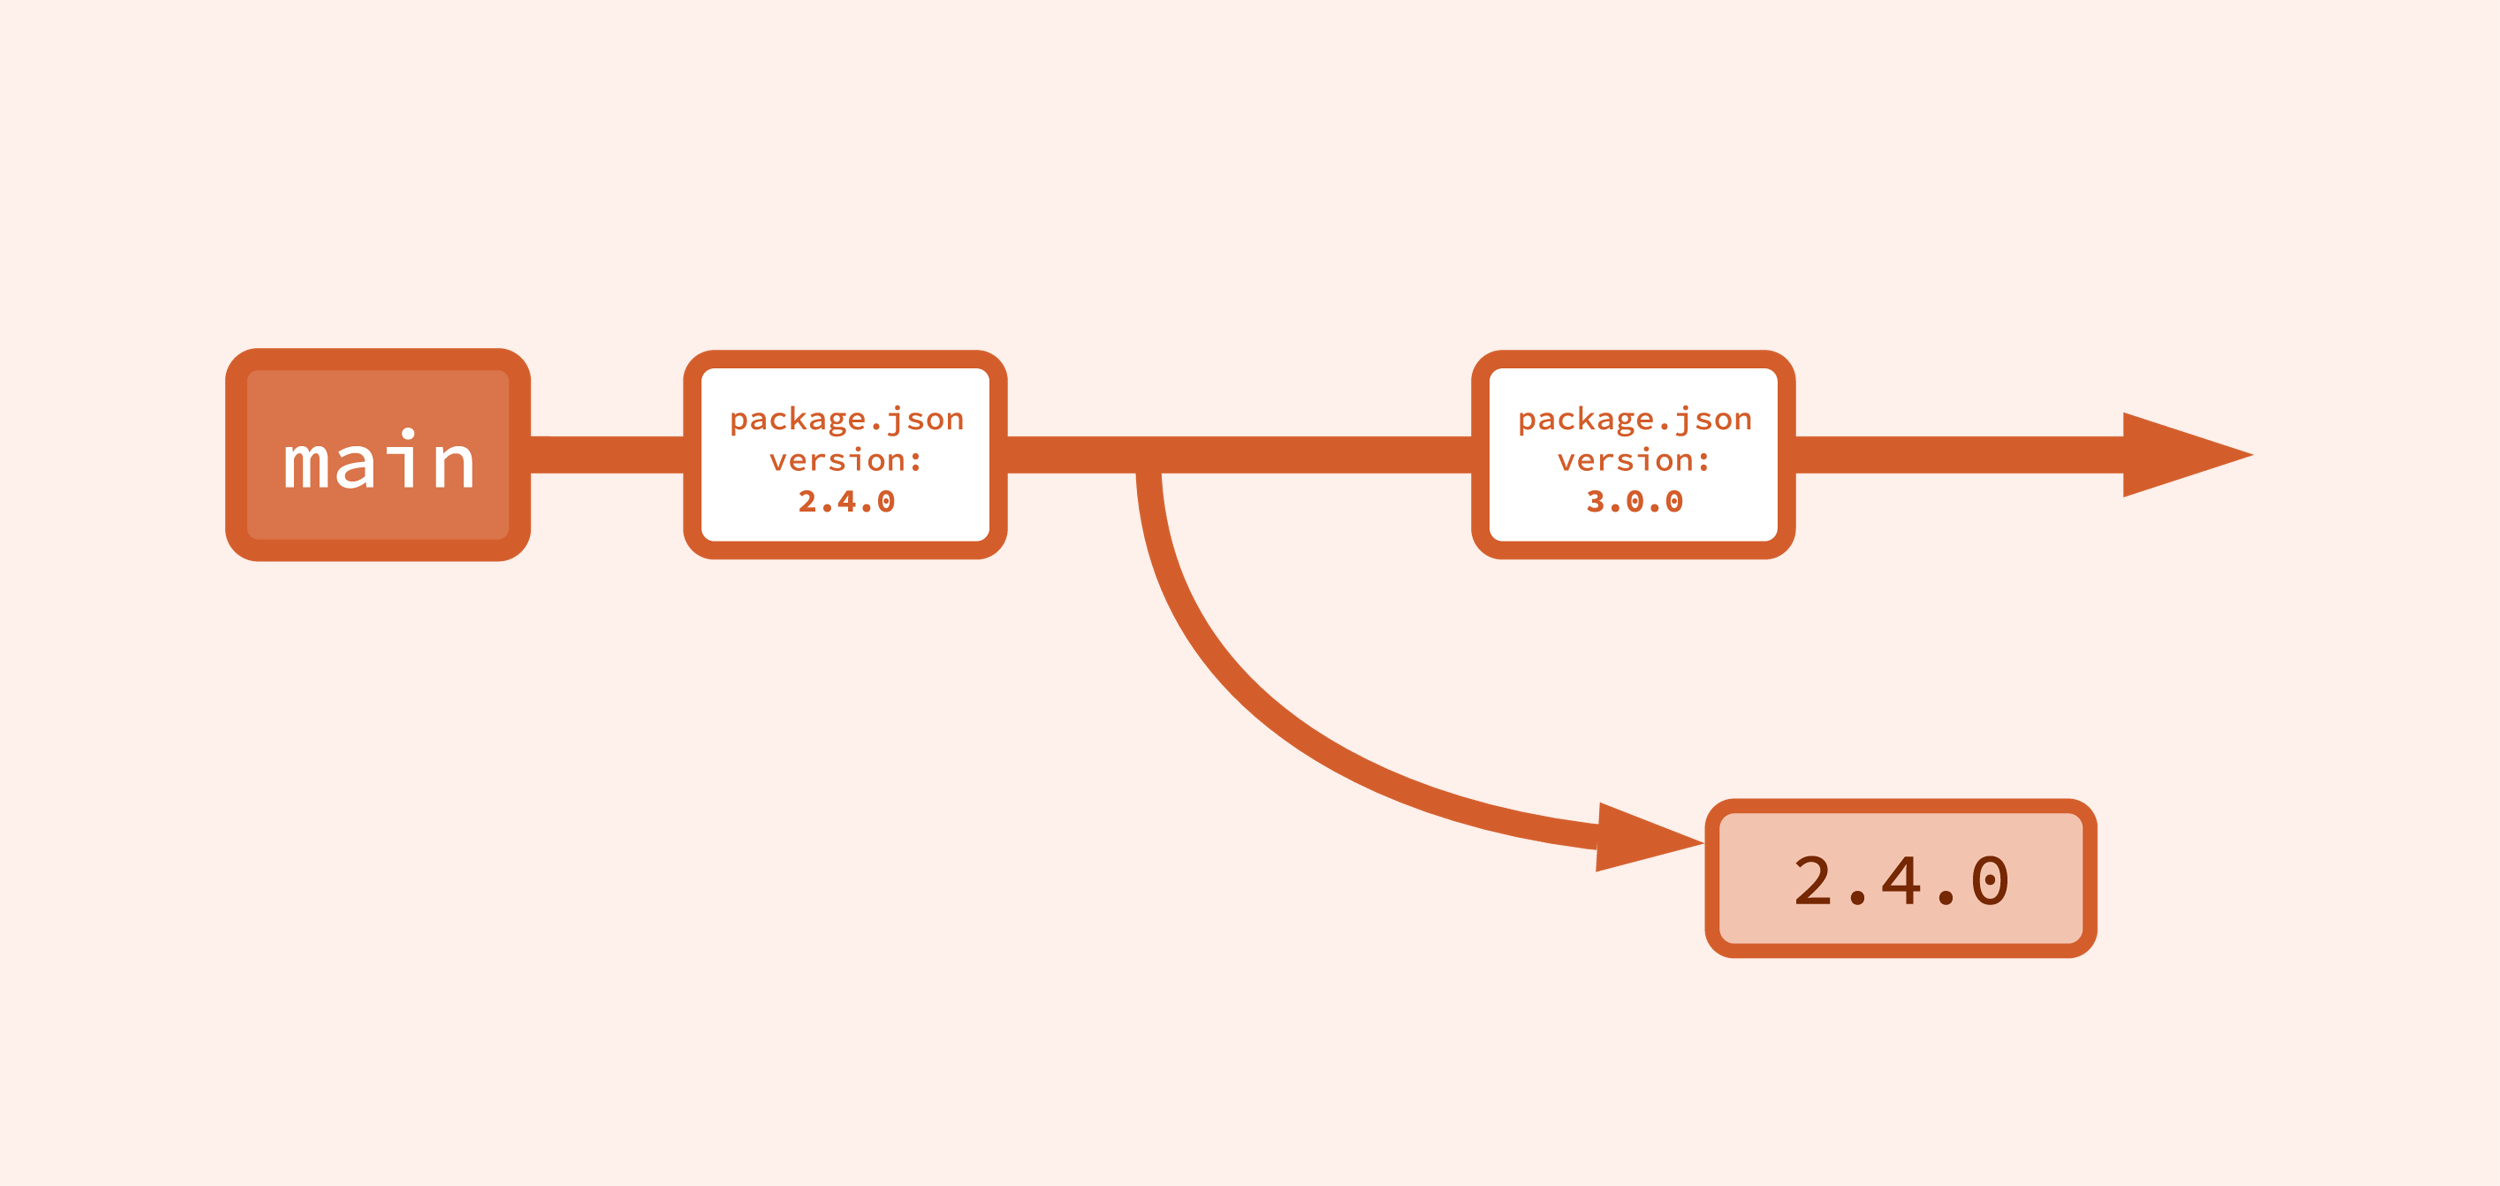
And what if you want to release the next major version now, not after the next release? Well, folks, it’s so straightforward I can hardly stand it.
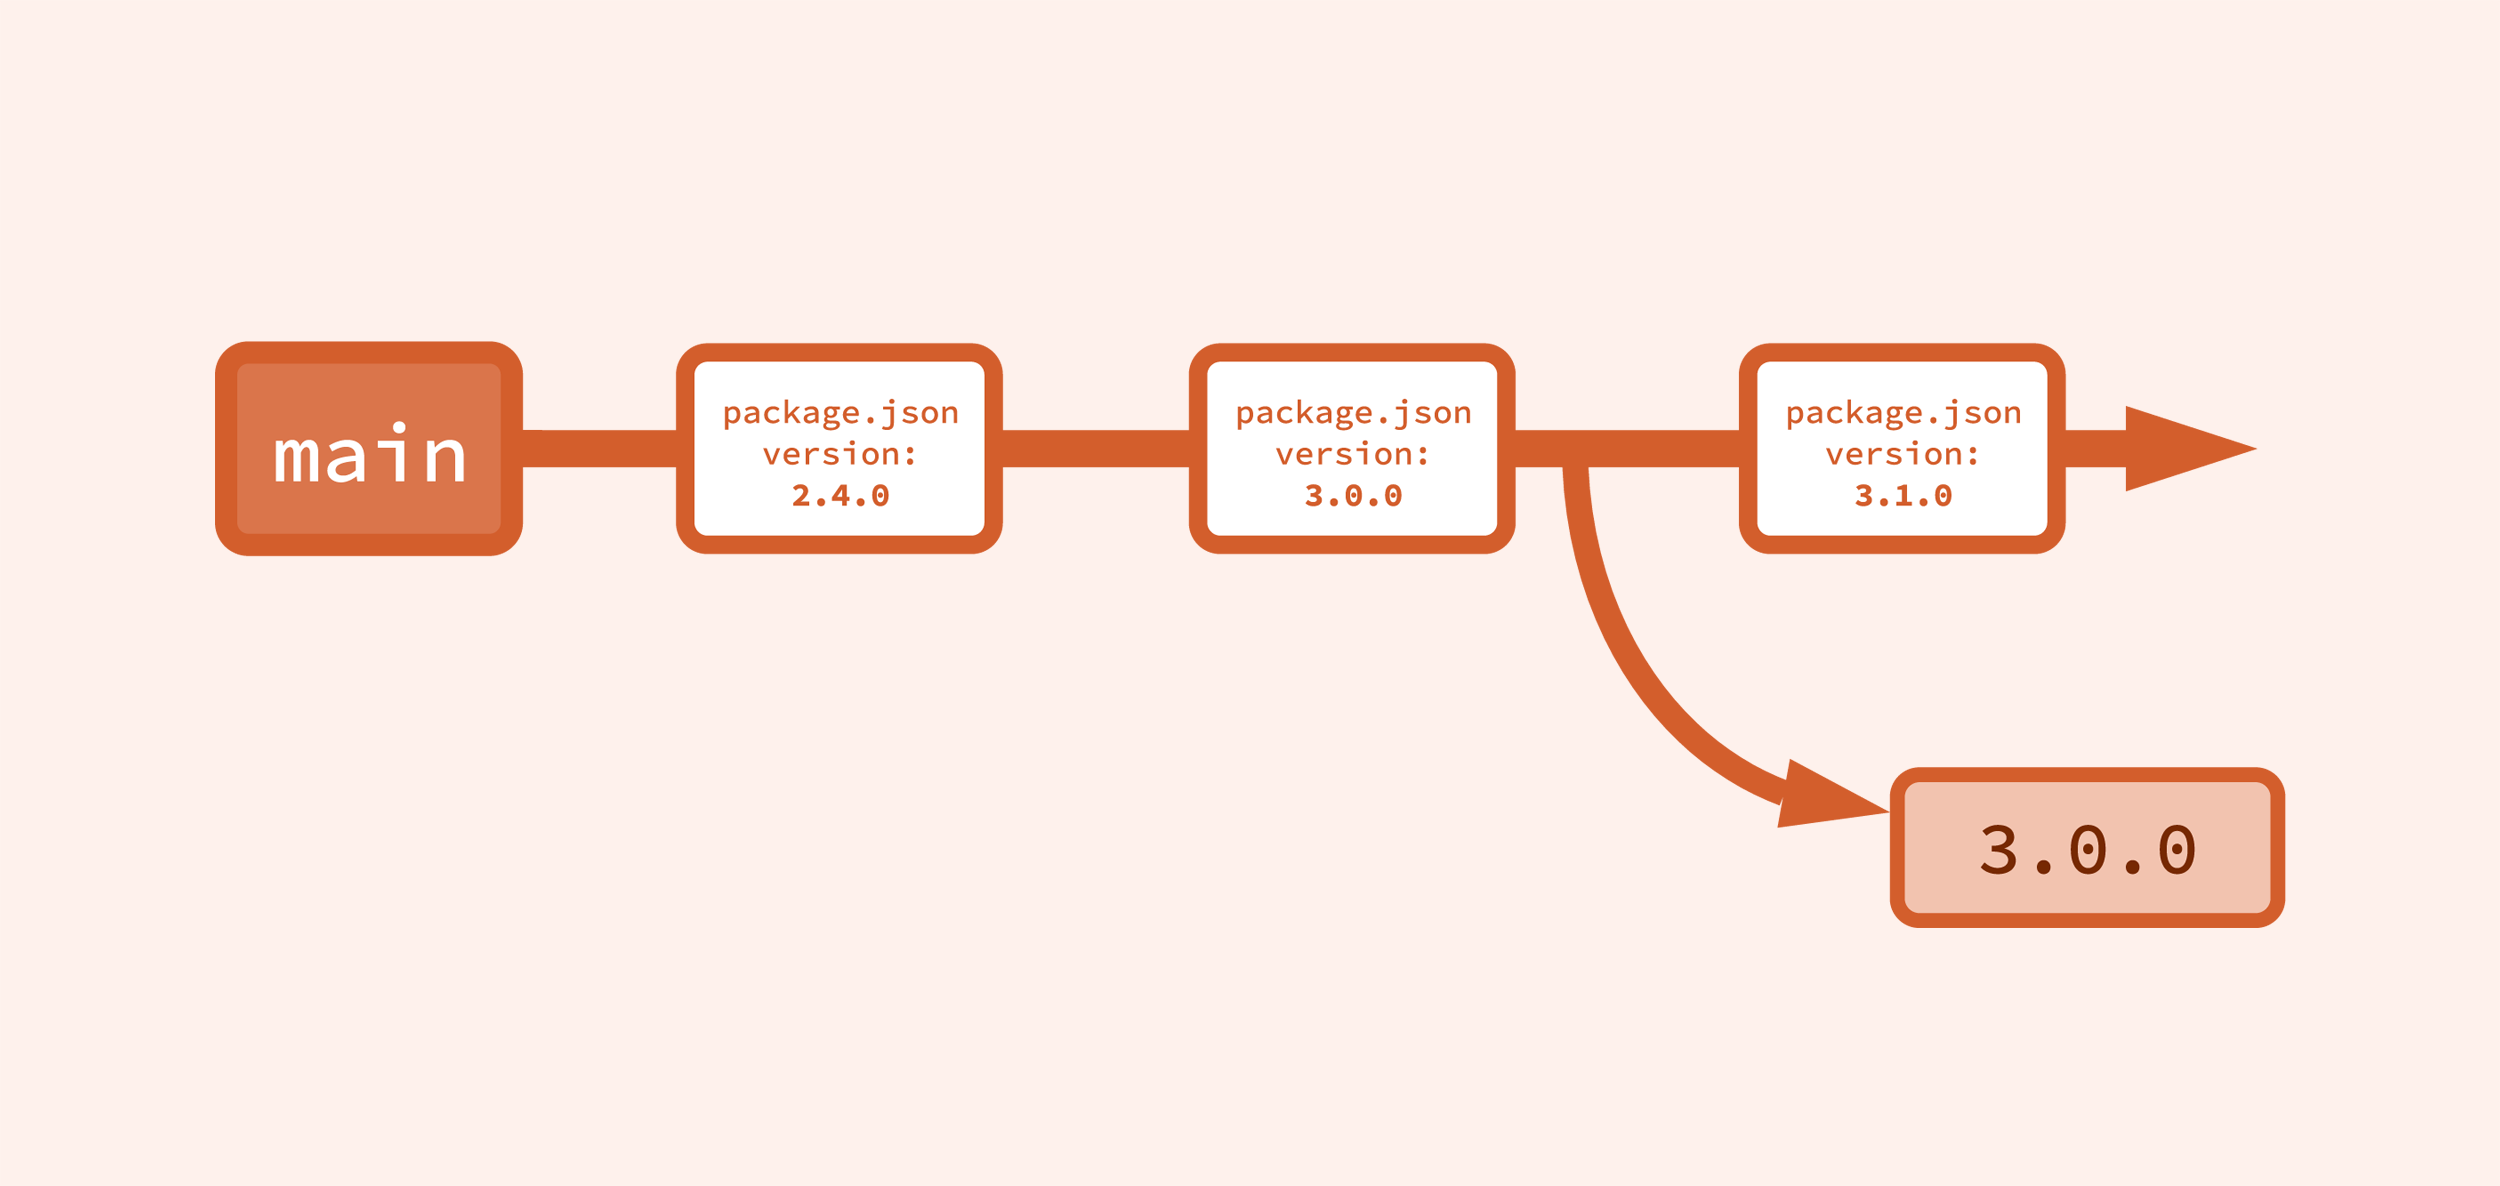
Yep, just increment the version of the code on main to the next major version, then proceed as normal to a release.
Conclusion
NMVS is currently in use all over the place, in software projects of all sizes, and works at scale well enough to support even the largest code bases.
I find it keeps releases smaller and more predictable, doesn’t burden developers with having to worry about managing tons of branches or having to know which release their code needs to target; you always work from, and to, main.
NMVS does have its drawbacks. I don’t find it particularly intuitive. And, although it makes developing simpler, most of that complexity has simply been stashed away in the backporting and releasing tasks. So it absolutely requires good documentation and at least one experienced developer to help keep things straight during the first few releases.
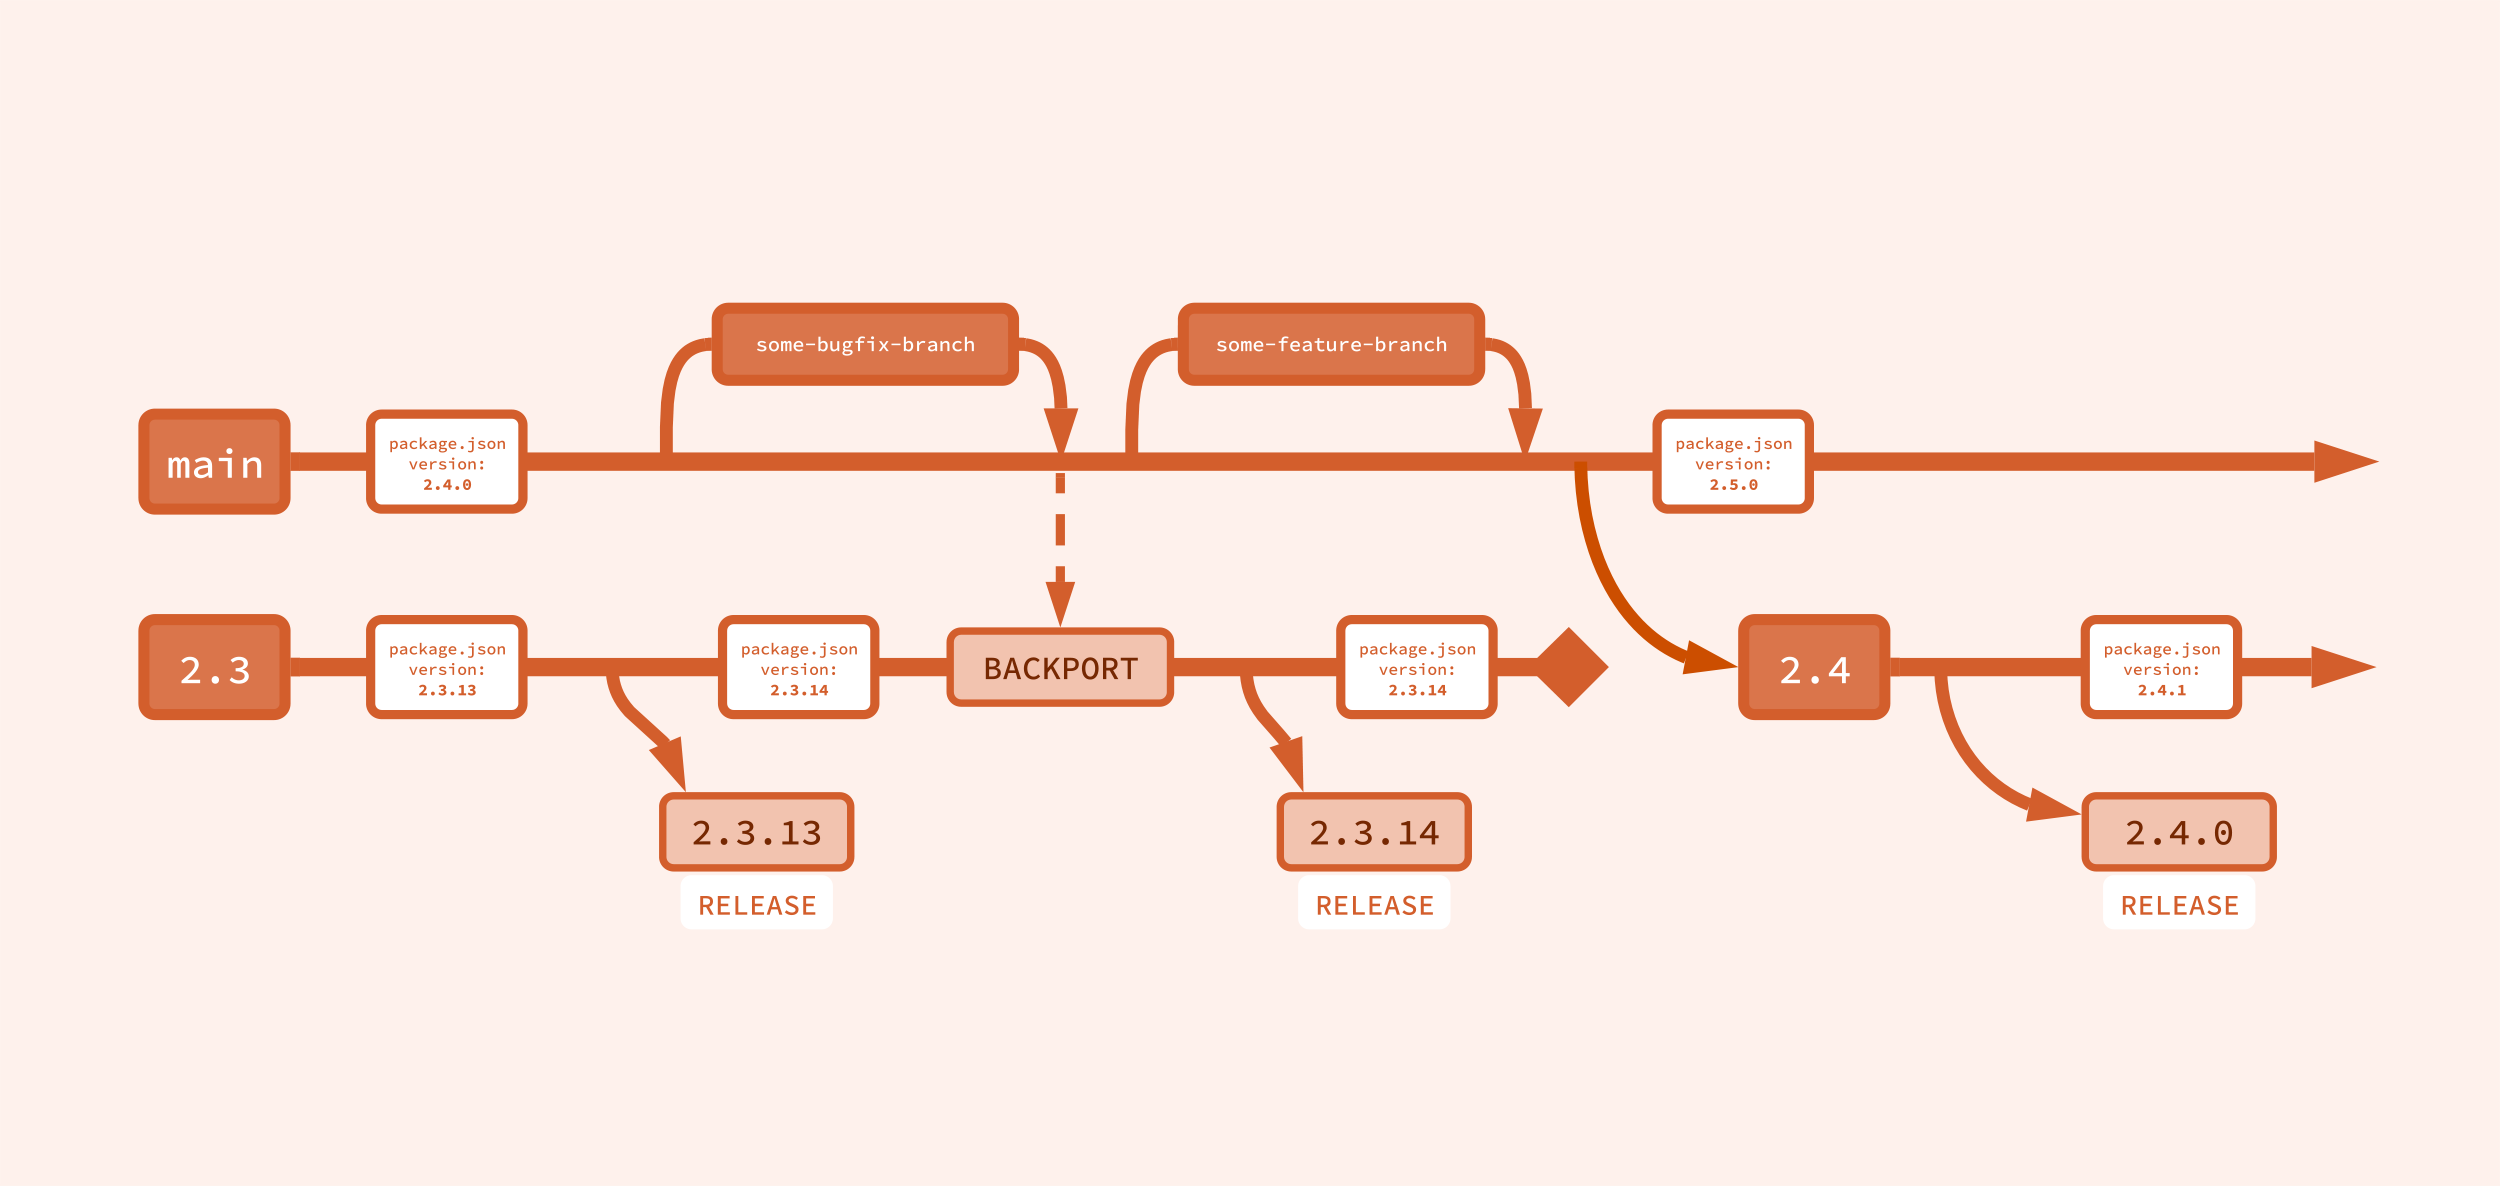
I do think, overall, NMVS is worth it. And if you think so too, maybe it’s the right system for your next project. Which means we’re finally ready for the last, final, way-too-detailed diagram of ultimate complexity. This is NMVS. I’m sorry:
