Every so often it happens that a web developer wakes up one afternoon and decides, against everyone’s best judgment, they need a personal website. It could be for professional reasons, or personal ones, or just to try out a new platform. Whatever the case, the web developer will then promptly put off starting the project for a minimum of three months.
After those three months pass, the developer will finally “find the time” (an enormous lie; they had wasted hundreds of hours doing other things), and get started on The Personal Site That Will Change the World. The problem is, a web developer freelancing for herself in her spare time is like a chef who works sixty hours a week cooking for herself at 2:00am. Sure, she’s got the freedom to cook anything she wants, but “I make food all day and all I want to do is boil this $0.49 cup of noodles and attempt to inhale it while I sleep” always wins out. It’s a curious fact most high-stress chefs just eat the easiest food after a shift. Most web developers, when faced with a personal web project, just develop the easiest website.
I found myself in this situation last week. I needed a personal site for various reasons and, since I work full-time as a web developer, I just wanted to inhale some Ramen noodles and go to sleep. I didn’t want to deal with databases, WordPress, build servers, any of that. And, as the site took shape, it occurred to me the steps and patterns I used could be of interest to other web developers. Newer coders are easily scared off by complicated-sounding systems and, even if they understand 35 of the 36 steps needed to build a site, all it takes is one incomprehensible direction to sink their project.
So, here, I’m going to outline every single step I took to make and update this blog. I’ll use only the simplest concepts and explanations. I want this to be thorough enough for my friends who are interested in front-end coding to be able to follow every step and, hopefully, decide whether this is a career they’d be interested in pursuing.
That, and if I ever make another blog like this, I’ll be really happy I wrote it all down.
The Requirements
I don’t want to deal with a database-driven CMS, like WordPress or Drupal. Yeah, they’re powerful. Yeah, the setup is easy. And if I were a team of people updating my site every day, I’d probably go with one of those. But I’m interested in a “set it and forget it” option. I don’t want to have to ensure a MySQL database server is running 24/7 forever, and have to remember how to troubleshoot it if my site starts returning a mysterious error. I want a flat-file site, where everything from posts to categories are all just files on a filesystem. If all you’re doing is making files, you can them host anywhere, and the site’s going to be faster and less prone to failure.
I also don’t want to pay for it. Sorry, but I don’t. There were some sexy-looking options out there, like Statamic and Kirby, but I want something that’s entirely self-contained and could be copied, edited, repeated, and hosted anywhere. Paid options aren’t great for that. And also it’s tough to justify paying for something that, realistically, could just be a few .txt files.
After weighing my options, which included Monstra, Grav, and more, I settled on Jekyll. It appealed to me most because of a fairly rich feature set and, crucially, the concept behind it boiled down to this: Just make a bunch of files, put a few variables at the top, and our script will take all of that & give you a single folder that will contain your entire, completed website. This is basically the developer equivalent of just boil a cup of noodles, you lazy useless sloth. Perfect.
The Tools Needed
Jekyll is for developers. It’s not a button to click or a download-and-open it application. You have to spend some real time learning how to use the tools needed to run it. This is exactly what being a front-end developer means. Most outsiders think software engineering is all math, or hacking, or both. It isn’t. What it boils down to is taking the time and patience to figure out a pattern or a concept or tool you can then reuse. It may take you minutes, it may take you weeks, but once you’ve learned it you’ve got it forever. And once you’ve mastered a few basic concepts and patterns, you’re suddenly a front-end developer who makes more money than your high school principal. So learn these tools:
1. Git & Github
These are the bread and butter of modern coding. You can read about git’s history on Wikipedia, but it can probably be described best in one sentence: It keeps track of all of your files, logs your changes to them, and then stores them on a server so any number of people can work on them without stepping on each others’ toes. This also means you can revert changes to any point in its history, see who wrote which lines of code, and much more. It’s also free. Learning the basics takes an afternoon and mastering the advanced stuff is something you’ll probably never need to do. There are a million great tutorials for learning git, like this one and similar. Go nuts.
GitHub is just a place to store the files you’re managing with git. That’s it. It’s also free for personal use. It provides great interfaces and tools for seeing your files and history and why they give away all that great stuff for free I’ll never know. Once you have the basics of git down, you’ll understand GitHub. Get an account today, right now. There’s no reason not to.
I decided to keep all of the code for this website on my github account. This will allow me to pull the code onto any server I want, and also keeps a complete version history of every change I’ll ever make. So that’s where my code will officially live.
2. Any code editor
This one’s easy. If you want to write code, you need to find a code editor you love. There are a bunch of free options and you can use anything from VIM (if you like command-line) to TextMate (if you don’t) to Sublime (if you want the best of both worlds). I prefer Atom, which is a bit more technical but still easy enough to use. Just download one and get to touchin’ files.
3. Basic UNIX command-line
Running web things generally requires basic command-line knowledge. If you’re on a Mac or Linux box, just open up a terminal (in OS X, it’s the "Terminal" app) and start messing around. Google anything you don’t know how to do. You’ll be using these terminal commands to actually run Jekyll, commit to your git repository, and publish your site to a server. You can get the basics down in a few hours and then spend a lifetime learning to be mediocre at command line. It’s tough and the nerds who master it are mythical Linux titans who basically run the world (but can’t wear matching socks).
4. The basics of web hosting
The concepts behind basic web hosting used to be a mystery reserved only for sysadmins and webmasters. They could charge unknowing clients thousands of dollars a month for what amounted to a Dell laptop hooked up to a DSL line in Romania. Nowadays that doesn’t fly, as solid, expandable webhosting is cheap and easy to understand. Learning how a basic web server works, how to connect and set up a website, varies from host to host. I’d personally recommend a place like Digital Ocean who, for only a few bucks a month, keep a little slice of the internet at your disposal, 24/7 for whenever you need it. But, any good host with lots of online support will work. I’m hosting this site, currently, on a Media Temple VPS.
5. StackOverflow
When I’m hiring a front-end developer, I always ask one question: “If you don’t know how to write something, how do you learn how?”. The candidates that answer “Probably Googling it and looking for the StackOverflow thread” usually end up getting the job. It’s arguably the web developers’ number one tool. Learn to love it, you’ll be searching it daily.
The Setup
Armed with these tools, I was ready to make this site happen. Little spoiler here: I’ve made a thousand websites in my life. I’m well-acquainted with every tool and framework I needed. This site is stupid-simple to make and maintain. But, even considering all that, developing this site took me days. And hours of abject frustration. If this strikes you as awful, illogical, or undesirable in any way, turn back now. Web development isn’t for you. For those of you still with me, here’s what I did.
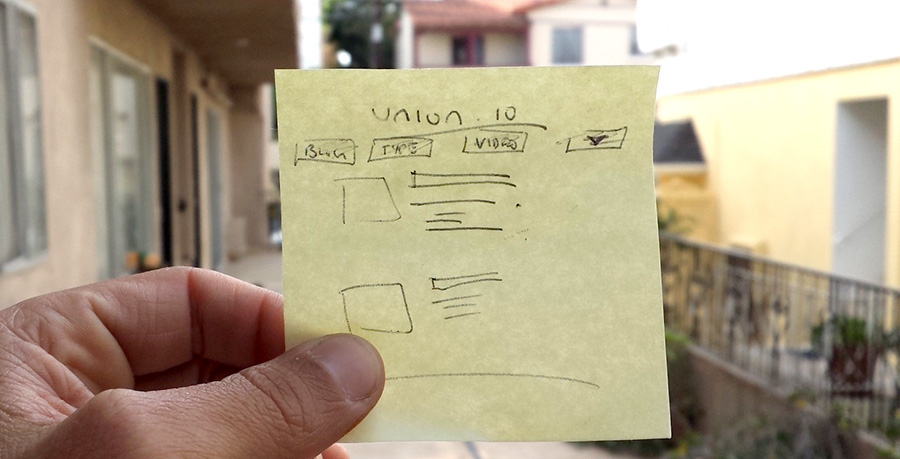 My very, very advanced wireframe concept.
First things first: Draw out what you want the site to look like. Pictured above is my very advanced wireframe concept. I drew it on a post-it note in five seconds. But, strangely enough, it was pretty useful. Armed with that, I started looking for open source Jekyll themes that might be easy to customize into my post-it note idea. I found one called Clean Blog which, you guessed it, is a clean-looking blog theme. Looked good, and included all the basic Jekyll files and structure already, so that was a pretty easy choice.
I created a new repository on my GitHub account, downloaded and copied over the files from the Clean Blog theme, and made my first commit. It was as easy as using Terminal to run a few git commands. If you are unsure how to do this, just Google it. These are well-trodden paths. Any error you run into, Google that too. This is the Creed of Everyone Who Works on Internet Things.
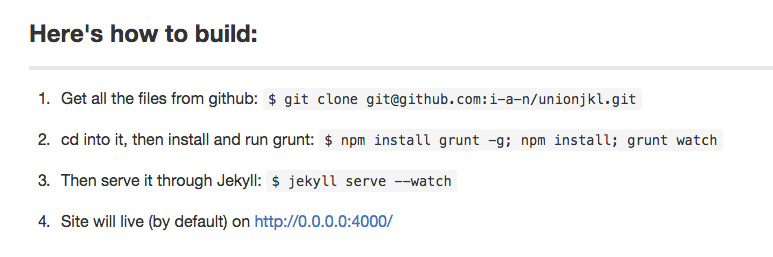 Hyper-detailed instructions to self.
Using this Creed, I distilled everything I needed to do to run Jekyll—and create an actual website folder—down into the four steps shown above. Then I saved those instructions to my git repo, so I’ll never lose or forget them. Running those commands in Terminal will now make a website, and host it so only you can visit it. You should be able to see some light at the end of the tunnel now: With only minor configuration tweaks, I basically already have a functional website, and if I run it on a public web server I’ll have a working, functional blog instantly. Not bad!
The Customization
So now I had something safe, simple, and repeatable. But it basically looked like the default Clean Blog theme, and I wanted something highly customized. This is the more creative part of the process; I love front-end development precisely because it’s a marriage of both creative and logical thinking. Choosing the fonts (I chose Lora and Montserrat [Note: Currently using Fira and Work Sans), colors, sizes, and icons are enormously fun. You can customize any site infinitely by editing the CSS and tweaking the layouts (Google how to do those in a Jekyll layout). Front-end people love this part but all-too-rarely get to do it. After a few hours too many of playing with variables, I was happy with the general look at feel.
(I should note, since I used git, you can simply rewind my GitHub repository to see the changes I made, when I made them, and my dumb comments with each commit. This probably isn’t too interesting, but it does function as a complete development history for the entire project, should you care to see it.)
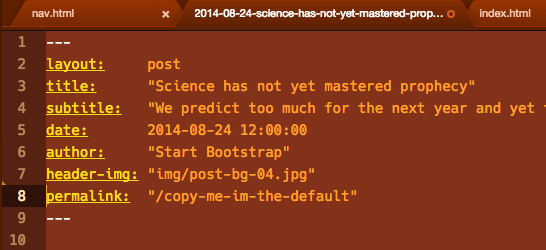 Standard Jekyll post variables.
Another step I took was customizing the Jekyll post variables. Posts in Jekyll are just text files with a bunch of post information at the top of them. The default variables, pictured above, didn’t quite have everything I wanted. Jekyll lets you add any variable at all to the top of the post, and then access that variable in the layout by referencing page.variablename. So, for instance, I wanted an “estimated reading time” variable with each post. I just added a “readtime” variable like so:
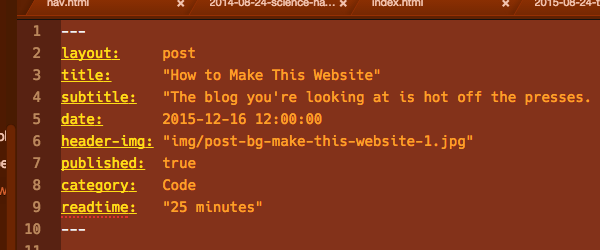
Then added it to the template, like this:

You’ll need to Google the syntax and specifics for the templating language. Remember the Creed. After some trial and error I finally got that stupid Estimated Reading Time to work. It’s learning how to do dumb stuff like this, dozens of times a day, that makes developers so valuable.
The Deploy
So now I had a customized blog, with a few silly posts, loading locally on my laptop. Showing it to the world takes some big decisions. GitHub does offer Jekyll hosting for free, but I want to eventually do some complicated things outside of the blog, so I decided to self-host. I had two major options for deploying:
First option: Deploy a script on the server to listen for changes to the GitHub repo, pull them in, and automatically rebuild the site
Whoa there Einstein, slow down! This one appealed heavily to the nerd in me. The concept is basically this. When I commit a change (new post, new image, anything) to my GitHub repository, a script on my public server would spring into action, pulling in the new change and then using Jekyll to rebuild the site instantly. Very little overhead, very efficient. Also, in the event I need to load-balance or deploy to many servers, each one would update itself instantly. Awesome.
Second option: Write a local script to build the site, then copy the finished files directly to the server
This one is so boring. Running a script manually? What am I, a caveman? Instead of just committing a change and being done with it, I’d then have to run a command that does the actual update to the server. This one did not seem sexy and I wanted to avoid it.
I went with the second one.
Yes, it’s true. I tried a few server-side auto-deploys first, but just couldn’t make any of them bulletproof. I did get them working but it introduced, literally, a dozen new and interesting ways to fail. I’d also have to track new GitHub keys, and give new servers access to my personal GitHub account. I’d have to maintain identical Jekyll versions on my laptops and web servers. I’d have to ensure there were no problems with every single commit, since even a change that didn’t impact my site (like documentation) would spawn a new rebuild on the server.
In the end, I wrote a script I called "deploy.sh". It is two lines of code. When I want to update my site, I just run "./deploy.sh" and my site is updated to the latest version I’m working on. It’s less appealing, but it’s basically bulletproof. I documented the entire process here. Feel free to copy.
You can use the 'scp' or 'rsync' commands to do this, as long as the server you’re pushing to is configured to accept your SSH keys, that way you can connect to it without a password. The best tutorial on how to set up SSH keys is here.
The Conclusion
After much tweaking, I now had a script that compiled my site using Jekyll, and pushed the whole thing anywhere I wanted. All I had left to do was ensure the whole site was pushed to a logical place on my server (I used the file path /var/www/vhosts/blog.union.io/), point my web server to that location when it got a request for "blog.union.io" (Google how to do that for your specific hosting setup), and then tell the Internet to send requests for "blog.union.io" to that server’s IP address. You’ll do that part at your domain registrar or DNS host, which can be anywhere (I recommend Google Domains).
And finally, I followed a few tutorials on how to make category pages and how to add Facebook data to each post. These each had their frustrating moments but in the end, anyone can get through them with enough time. And when that was done, I had that moment. The moment you realize you created something with real value, that fills a real need. Visitors to my site—few and fleeting, sure—don’t see the frustration that went into it, or the flaws and frailties I can’t stop focusing on. Learning to accept that you just made something of professional caliber is the final boss of software development.
So sit back and have a whisky. Or two. You’ll need it, because as a web developer, you’re going to repeat some variation of the above process eight times a month until you retire.
And I love it.